It's been a long time. A lot of my slow speed comes from mistakes and the lack of confidence. I believe, once I finish this area, things will speed up, as I am already feeling my confidence building up nicely. The way in which I tackle each problem is only creating a stronger Marquis at the end of each session.
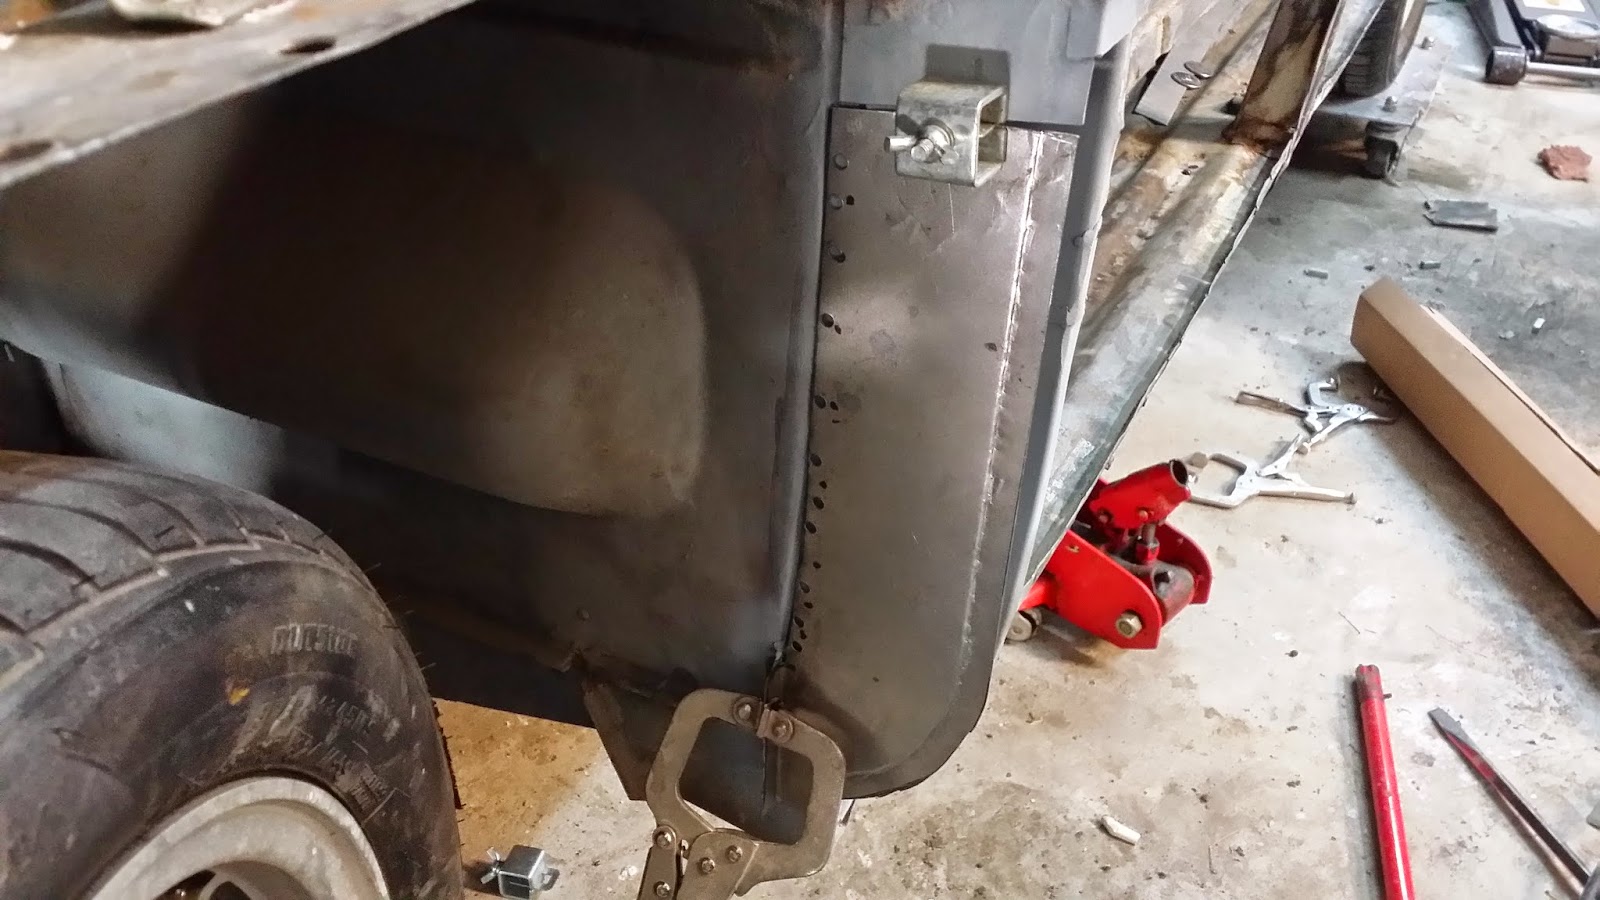
I finally got the B-Pillar closed up and sealed perfectly. I ended up switching from the AutoCraft parts to a Funky Green panel pillar. This pillar reaches farther up and it also closes the gap perfectly.
Once the B-Pillar closed up, I spot welded the inner rockers to the cross connects (top and bottom hats). In some cases, I had to use a MIG welder to spot weld behind the middle pillars. For the ones that were reachable, this spot welder was the fastest and cleanest method possible.
This is a photo that shows how I tried to access in the middle of the beam with the spot welder. In most cases, I didn't work well. I was tired of holding the welder since it is very heavy.
The inner rocker and the pillar and the pillar closeout plate looks solid. I've added some weldable primer to resist against rust that could form when closing the gap and from the welding process overall.
The outer rocker is finally sized up for the final time to make sure it lines up for welding. I need to purchase a few more magnets to make sure all areas along the panel mates the original across the van in a leveled way.
I will post pictures when I am finished with the welding of the side.
My first solo VW Bus restoration project with weekly updates. Come and experience the process with me by clicking the G+.
Showing posts with label Inner rocker. Show all posts
Wednesday, December 3, 2014
Wednesday, November 12, 2014
The Funny Green Panel vs AutoCraft
I am setting up the Funky Green Panel - B pillar, as the one from AutoCraft had a lot to be desired. It did not close properly and it also did not come with a block-off plate. Here I am sizing up my cuts before I begin to weld this piece in. I will also check the block-off and make sure the outer rocker panel will close properly. The block-off plate that I tried to fabricate did not allow the outer rocker to close as it did not have the right curve in the right area. My piece was pretty good, but for $40 for both parts, why do this? With the AutoCraft piece, you have no options, as the part showed in this photo comes alone.
I have a weird cut, as I want the piece to lock vertically and horizontally. More importantly, it has the standout tab to mount the block-off plate to it at the top, which I am heavily modifying to fit with my Dremel. The next photo will show the 1/4 of an inch that I'll have to raise it to. The bottom piece must completely clear the bottom lip of the inner rocker so that the outer rocker could sufficiently close. Please see my next photo.
As you can see, the clearance is not quite there. I will be back in the shop this weekend to complete this fitting session. Before then, I'll complete the inner rocker welds. This is all taking a long time as I am learning and I am learning that not all replacement parts are created equal. The outer rocker was purchased from AutoCraft and I must say, that it is awesome. So, this discussion is not to say AutoCraft is inferior, but we have to use the best part for each application.
Funky Green Panel vs My Fabricated versions. I was pretty good.. :-) The only real problem was the B-Pillar didn't allow the outer rocker to close. This could be because of the accident. The Green one just fits much better.
I have a weird cut, as I want the piece to lock vertically and horizontally. More importantly, it has the standout tab to mount the block-off plate to it at the top, which I am heavily modifying to fit with my Dremel. The next photo will show the 1/4 of an inch that I'll have to raise it to. The bottom piece must completely clear the bottom lip of the inner rocker so that the outer rocker could sufficiently close. Please see my next photo.
As you can see, the clearance is not quite there. I will be back in the shop this weekend to complete this fitting session. Before then, I'll complete the inner rocker welds. This is all taking a long time as I am learning and I am learning that not all replacement parts are created equal. The outer rocker was purchased from AutoCraft and I must say, that it is awesome. So, this discussion is not to say AutoCraft is inferior, but we have to use the best part for each application.
Funky Green Panel vs My Fabricated versions. I was pretty good.. :-) The only real problem was the B-Pillar didn't allow the outer rocker to close. This could be because of the accident. The Green one just fits much better.
Tuesday, October 21, 2014
The inner rockers are permanently welded in. I had to remove them and straighten back out the metal, as I welded it too forward the first time. I was going to order a new one, but I thought it would be a better exercise if I fixed what I destroyed to help keep my cost down and save time waiting for the new part to come in. Also, I've welded in the b-pillar post cover that I also had to re-work. Hey! I'm learning the hard way, but it is learning indeed. I still have a question posted on a forum on how to handle the tab down on the bottom left.I believe it has to be bent over and weld closed. If I don't get a response, I'll take a look at the other side
Here is the outer rocker mating up to the B-pillar post that I fabricated. I'll have to grind down some of the arch, as it doesn't allow for my tack-weld holes to line up. These wholes were made with a flange tool. The reverse side allows you to punch holes into sheet metal like paper. It works with a compressor. Please see the photo at the very end.
Along the top side panel, I'll have to grind down some of the ridges that doesn't allow the outer rocker to mate evenly to the bottom. This doesn't allow the weld holes punched in the bottom to mate to the inner rocker. This will be fixed on my next visit to the garage.
Here is how the side rocker panel looks when mated up. As you can see, this will look pretty good once welded in. This will start next weekend. I got an immunization shot on Saturday that made me feel pretty sick, so I had to stop.
Here is the outer rocker mating up to the B-pillar post that I fabricated. I'll have to grind down some of the arch, as it doesn't allow for my tack-weld holes to line up. These wholes were made with a flange tool. The reverse side allows you to punch holes into sheet metal like paper. It works with a compressor. Please see the photo at the very end.
Along the top side panel, I'll have to grind down some of the ridges that doesn't allow the outer rocker to mate evenly to the bottom. This doesn't allow the weld holes punched in the bottom to mate to the inner rocker. This will be fixed on my next visit to the garage.
Here is how the side rocker panel looks when mated up. As you can see, this will look pretty good once welded in. This will start next weekend. I got an immunization shot on Saturday that made me feel pretty sick, so I had to stop.
Tuesday, October 14, 2014
Fixing the front B pillar post
After trying to weld the beotch to non-weldable primer, I finally got it straightened out. This piece was fabricated in-house, as no suppler carries the B pillar cover.
Not the best looking welds in the world but they are holding after I removed the primer and tack welded the plate in. I've wire brushed the welds and the next photo will show it in primer.
Next I'll just have to grind down the welds so that I can close up the side rocker panel. I primed it up so it doesn't rust over the week, until my next time in the show next weekend. This is weldable primer, so that any touch ups can just be cleaned and welded.
Not the best looking welds in the world but they are holding after I removed the primer and tack welded the plate in. I've wire brushed the welds and the next photo will show it in primer.
Next I'll just have to grind down the welds so that I can close up the side rocker panel. I primed it up so it doesn't rust over the week, until my next time in the show next weekend. This is weldable primer, so that any touch ups can just be cleaned and welded.
Thursday, September 11, 2014
Before and after
This picture, I was finished trying to repair the inner rocker. As you can see, after trying to weld in some metal over rusted parts, I cutaway a piece because I realized it should be completely replaced.
Tuesday, September 2, 2014
Labor Day Week-end with the Bus.
I've partially installed the new jack port under the drivers'side rear. This is weld-thru primer, so that it would not rust while I am tackling other small jobs. I am sort of running low on argon/CO2.
This is the inner wheel well that I am patching in. The original one was rusted and it is easier to replace complete, rather than trying to cut out a lot of small little patch sections. The piece is tacked in, secured and ready for full welding on the next weekend.
Here is the side view of the work to be done.
Again, making sure the inner rocker fits well before I progress to the next stage. I'll just need to remove the rust under the cargo floor and pop in some spot weld holes on the top of the inner rockers.
I have the replacement (driver's side) B-pillar welded in on the driver's side. So far, this all looks good. I'm looking for a way to deal with the A-Pillar before I work on the dog legs.
This is the inner wheel well that I am patching in. The original one was rusted and it is easier to replace complete, rather than trying to cut out a lot of small little patch sections. The piece is tacked in, secured and ready for full welding on the next weekend.
Here is the side view of the work to be done.
Again, making sure the inner rocker fits well before I progress to the next stage. I'll just need to remove the rust under the cargo floor and pop in some spot weld holes on the top of the inner rockers.
I have the replacement (driver's side) B-pillar welded in on the driver's side. So far, this all looks good. I'm looking for a way to deal with the A-Pillar before I work on the dog legs.
Sunday, August 3, 2014
Well & Rocker configuration check
Part of the wheel well was removed from the rear driver's side. I had to also cleaned up the floor pan line that mates up to the replacement rocker panel.
I tack welded the replacement panel into place for sizing. I needed to run the inner rocker to make sure it would line up when I am ready to weld both of these pieces into their respective places.
Here is a picture of the rocker partly in place. I had to remove the jack port, as it bent to the left and causing the rocker not to be able to sit plush against the mounts. I removed the jack port which you'll see in a photo below (see photo below). Also, I'm starting to clean up the lip in which the rocker will mount to the underside of the cargo floor. But, before all of this, I need to bend the cargo floor straight as there are a few dips in the floor that would show up after painting and look bad. I'll post he device that I am building to help with that.
Here is a complete side view of the repair work in progress.
This is the undercarriage. As you can see, it is lightly rusted. I am going to paint this rust with POR-15, which bonds to run and makes it harder than the original metal (hammer resistant). Since it seals and encapsulates, it should never rust again. Underneath will look very luxurious. I'll cross that bridge when I get there.
I tack welded the replacement panel into place for sizing. I needed to run the inner rocker to make sure it would line up when I am ready to weld both of these pieces into their respective places.
Here is a picture of the rocker partly in place. I had to remove the jack port, as it bent to the left and causing the rocker not to be able to sit plush against the mounts. I removed the jack port which you'll see in a photo below (see photo below). Also, I'm starting to clean up the lip in which the rocker will mount to the underside of the cargo floor. But, before all of this, I need to bend the cargo floor straight as there are a few dips in the floor that would show up after painting and look bad. I'll post he device that I am building to help with that.Here is a complete side view of the repair work in progress.
This is the undercarriage. As you can see, it is lightly rusted. I am going to paint this rust with POR-15, which bonds to run and makes it harder than the original metal (hammer resistant). Since it seals and encapsulates, it should never rust again. Underneath will look very luxurious. I'll cross that bridge when I get there.
Thursday, July 31, 2014
Inner rocker removal - Update 7/31
![]() |
| A: Spot welds |
![]() |
| B: Rocker first cutout |
![]() |
| C: Removed Rocker |
As you can see, I cut part of the wheel well, which I am planning to replace as well.
![]() |
| D: Scrap metal |
Here is an update of the new inner rocker test fit. I realized that I might have to remove part of the D pillar to get the rocker to fit under. I will try to pull it back or hammer it in later after I clean up some of
the rust.
I removed half of the wheel well in preparations for a replacement panel that I have. The original one was too rusty and also, over cut when I removed the side panel. I want to start off clean keeping the bus from rusting again after painting. I only have a small lip to remove on the inside. Once that is done, I will strip down the paint and primer and spot weld the new one into place.Here is a view from another angle, where shows the small lip inside that needs to be removed on my next visit.
Subscribe to:
Posts (Atom)


.jpg)